Roles and Permissions
Sometimes you may need to assign specific permissions to each of the contributing researchers in your study based on their responsibilities. For instance, you may need to assign the Data Manager role to one of your researchers and grant them permission to access, view, and export data for further investigation. In another case, you may need to assign another researcher the Recruiter role with permission to enroll new participants, view participant information, and modify their enrolment data, but not be able to access their study data.
Our platform allows you to define and modify the roles and permissions for each one of your researchers inside the
Researchers page on your researcher dashboard.
In the following sections, we will discuss how you can create a role, assign it to a researcher and modify their permissions, so each of the researchers has specific permissions based on their roles.
Let's start with how you can manage roles for your study:
1. Managing Study Roles
Within the Roles tab of the Researchers page on your dashboard, you can create, edit, delete, and view roles. This
tab also provides a list of all roles already defined, their names, and associated permissions.
When you create a role inside the Roles tab, you are defining a role and its permissions throughout your study. As a
result, you will not be able to select a site in the Create a New Role dialog. To modify the access of a role for a
specific site, please see the Permission Adjustment section.
After creating a role, you can assign it to researchers on the Researchers tab, and make further adjustments as
necessary.
Here are some actions you can perform inside the Roles tab:
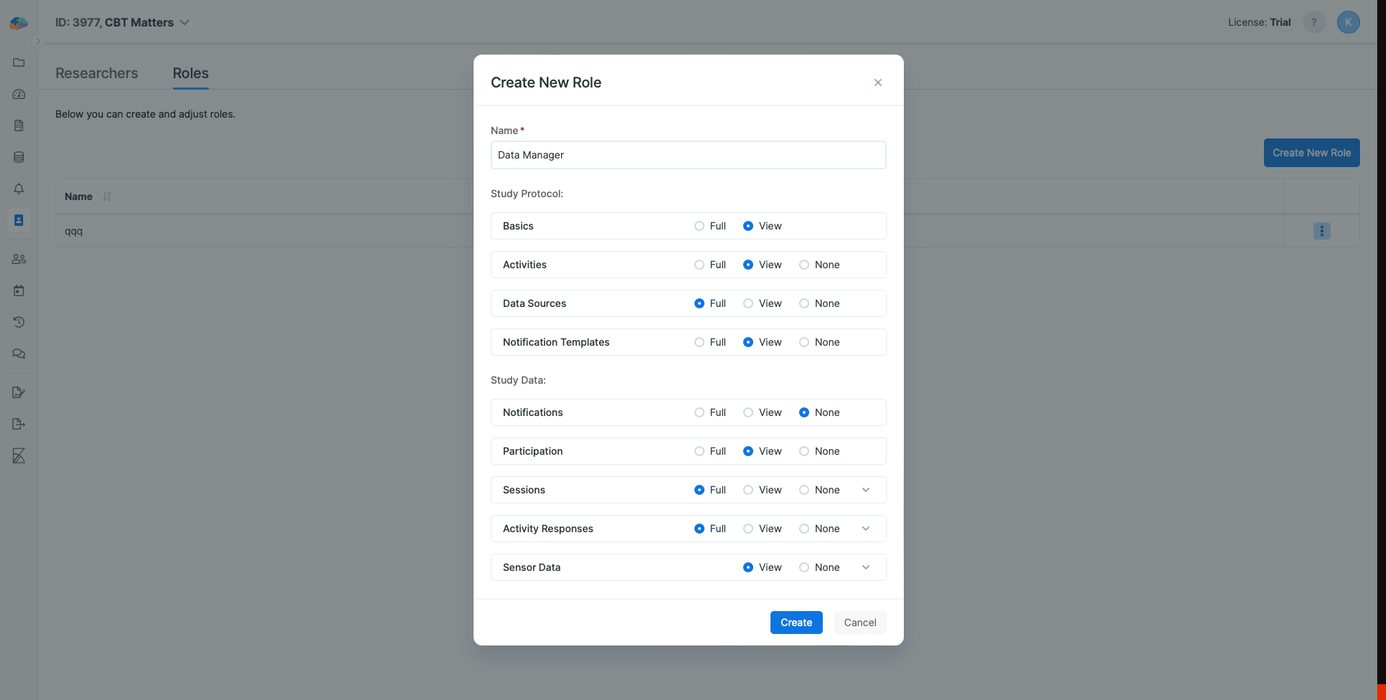
1.1 Creating a New Role
To create a new role with specific permissions:
- Open the
Researcherspage on your dashboard. - Navigate to the
Rolestab. - Click on
Create New Role. - Enter a unique name for the role, limited to 100 characters.
- Select the desired permissions for this role.
- Click
Createto complete the role creation.
1.2 Editing an Existing Role
To modify an existing role:
- Go to the
Rolestab and find the role to be modified. - Click the 3 dots menu and select
Editto change the role`s name and permissions. - Save the changes to update the role.
Doing so will immediately change the permissions for all researchers with this role.
1.3 Deleting a Role
To delete a role:
- In the
Rolestab, locate the role you need to delete. - Click on
Deletein the 3 dots menu and confirm your decision to remove the role.
Note that removing a role will revoke all of its permissions from the researchers who were assigned this role.
1.4 Pre-defined Roles in Avicenna
In addition to the roles that you can define in the Roles tab, there are some pre-defined roles.
1.4.1 Study Owner
As the name suggests, the study owner is a person who owns the study and has full control over all of it. Each study can have only one owner, and by default, the person who has created the study is the owner.
For example, the study owner is the only person who has access to and can control the study license information. Also, she/he is the main point of contact for any outreach from Avicenna.
The study owner can change the permission and roles of all the researchers even themselves. They can also promote/demote a researcher to the Permission Manager role or even make them the study owner.
To assign the study ownership to another researcher:
- As the current study owner, go to the Researchers tab.
- Click on the 3 dots menu next to the researcher you want to transfer the ownership to.
- Verify your identity and confirm the transfer to complete the ownership change.
Please note that in this case, the ownership will be removed from your account and transferred to the chosen researcher.
1.4.2 Permission Manager
Permission Manager is another pre-defined role that can be given to a researcher by the study owner or another permission manager.
Researchers with the Permission Manager role can modify the roles and permissions of any researcher in the study, including themselves, and excluding the study owner. They can also promote/demote other researchers to/from permission managers.
By default, there are no permission managers when creating a new study. The study owner can promote any researcher to be the permission manager.
To promote/demote a researcher to have/from having this role, follow these steps:
- In the
Researcherstab, click on the 3 dots menu next to the researcher`s name. - Select
Promote to/Demote from Permission Managerand confirm.
2. Managing Researchers and Permissions
In the Researchers tab, you can invite new researchers to your study, add or remove roles to each researcher, adjust their roles and customize them, or revoke their access from the study completely. Let's explain these actions in more detail:
2.1 Adding Researchers to a Study
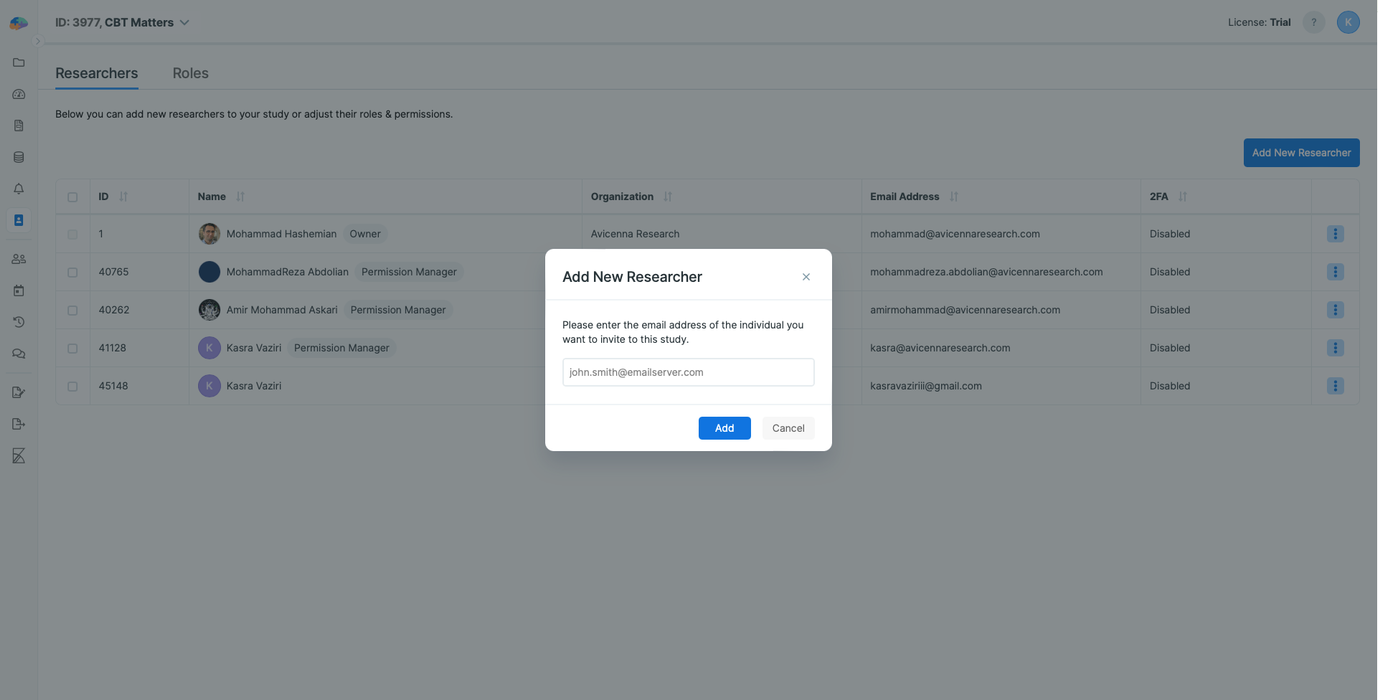
To add new researchers for expanding and collaborating within the research team:
- Open the
Researcherspage and move on to theResearcherstab. - Click
Add New Researcherand enter the researcher`s email address. Note that this new person should already be registered in Avicenna as a Researcher and also should have verified their email address. - Assign appropriate roles to define their access and capabilities.
- Confirm to finalize the addition of the researcher to the study.
2.2 Removing Researchers from a Study
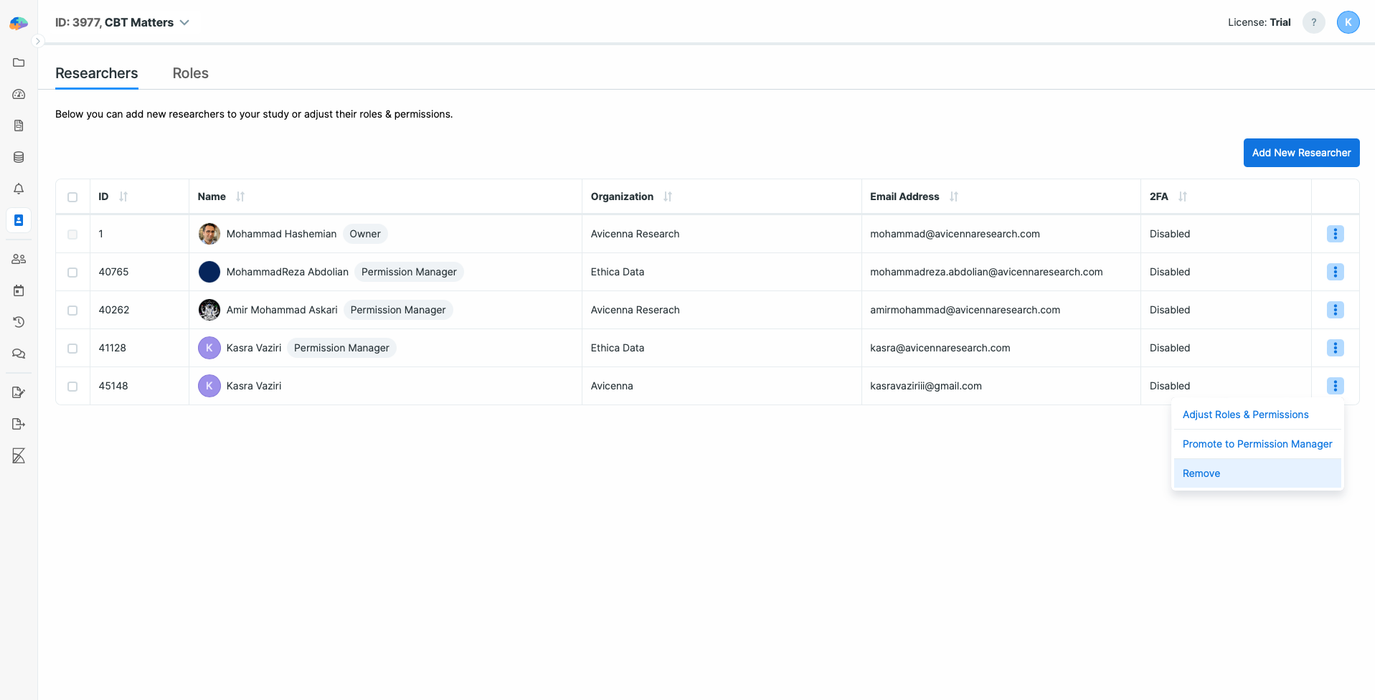
To remove a researcher:
- Navigate to the
Researcherstab. - Click on the 3 dots menu and choose
Remove - Confirm the removal to complete the process.
2.3 Adjusting Researcher Permissions
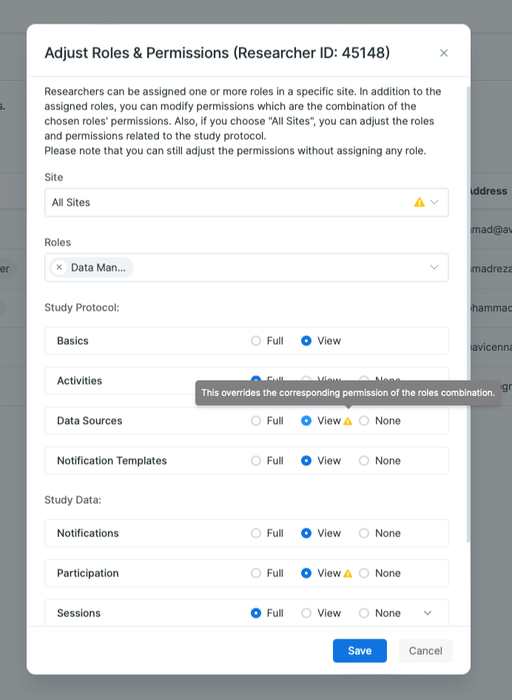
You can adjust the permission of a researcher and/or assign them a new role in the Researchers tab.
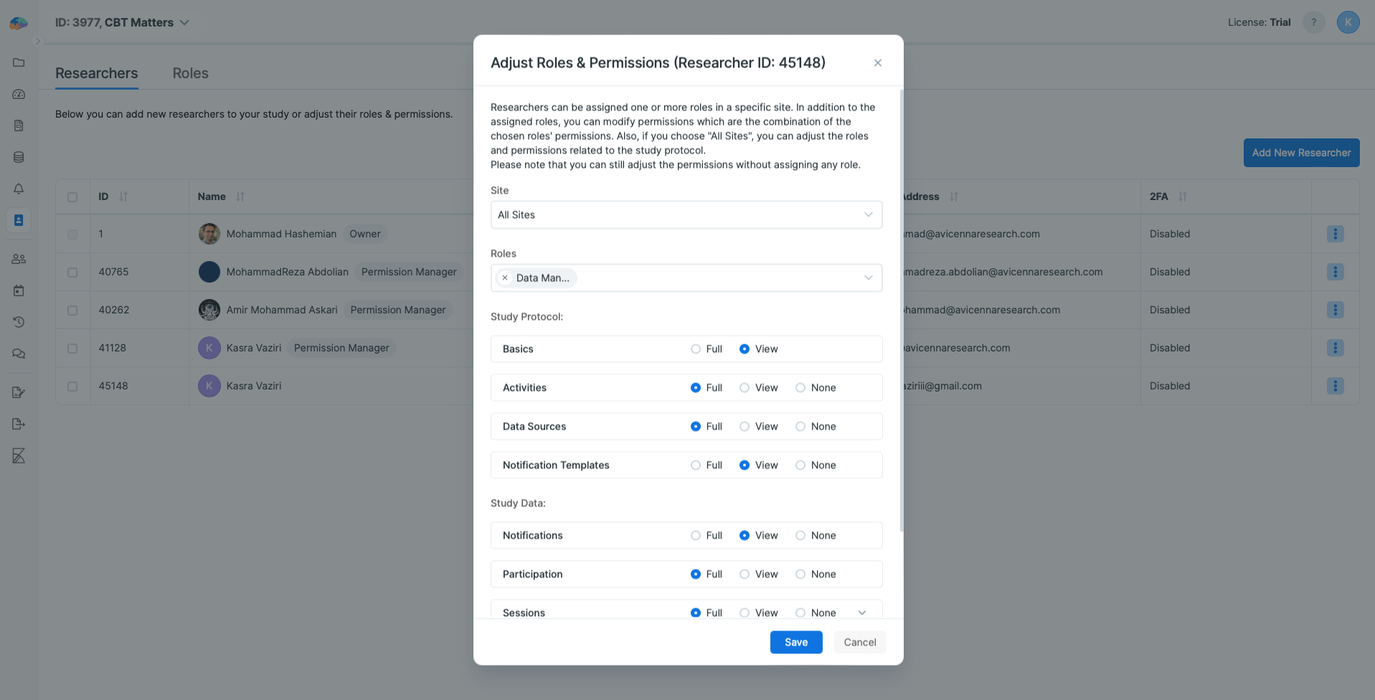
When modifying the permissions of a given researcher, you can specify the following:
-
Site: Using this dropdown, you can control whether the researchers' permission is applicable to all sites, or only a specific site. Note that you cannot give access to multiple sites to the researcher. It should be either just one site or all sites.
-
Roles: Using this dropdown you can assign researchers one or multiple roles. The union of the permissions for the selected roles will be chosen for the researcher.
noteSelecting a predefined role from the
Rolesdropdown will overwrite any existing permissions with the permissions defined for that researcher. These roles and their permissions can be managed in the Roles tab. -
Study Protocols and Study Data: In this section, you can modify permissions one by one only for this researcher. Changes made here will override the permissions defined in the assigned roles.
To modify the researchers' permissions follow these steps:
- In the
Researcherstab, click on the 3 dots menu and - Select
Adjust Roles & Permissions. - Modify their permissions.
- Save the changes to update their access levels.
There are 3 options for each of the permissions inside the Study Protocol and Study Data sections:
- Full which allows them to not only view the data but change them, export them, or modify them. For instance, they can generate new sessions for participants or export their responses to a specific activity.
- View which allows them to only view the data in the related section. Following the example above, researchers with this option can only view each session and its status, but they can not export the data.
- None which removes any access to the study protocol or data.
Note that when the permission is set to None, the related page to those permissions will not be shown for the researcher. For example, if the Notification Templates permission is set to None, then the Notifications page will not be shown in the researcher dashboard.
Also, if changing permission is overwriting a permission set defined by a role, a warning will be displayed next to the permission with a message.
Permissions Hierarchy and Dependencies
Within the Adjust Roles & Permissions interface, permissions are interdependent and hierarchically structured, which
affects the availability and scope of permissions adjustments:
-
Participation Dependence: The ability to modify
Sessions,Activity Responses, andSensor Datapermissions is conditional on theParticipationpermission being set to View or Full.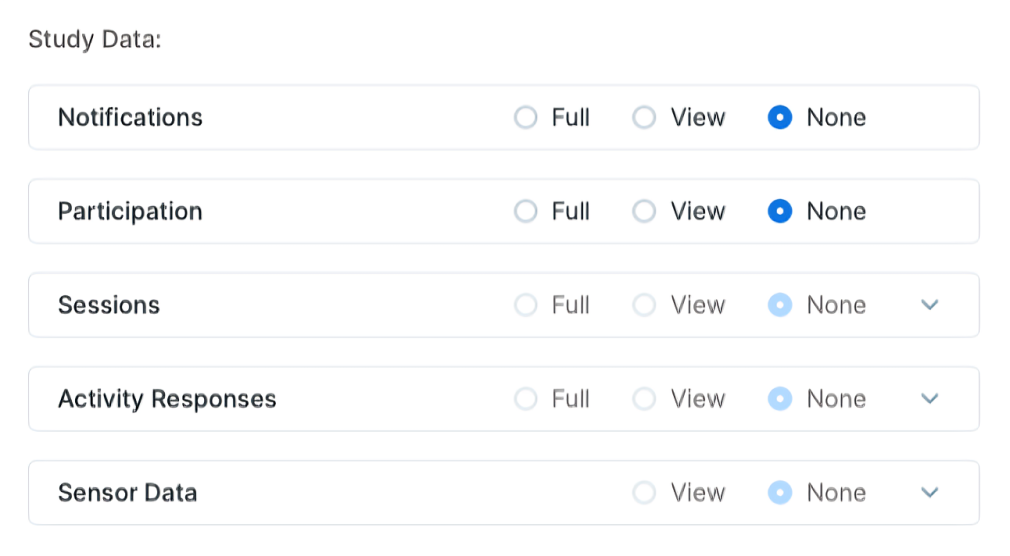
-
Sessions and Activity Responses Correlation: The permission level for
Activity Responsesis dependent on theSessionspermission level. IfSessionsis set to View, thenActivity Responsescan be set to None or View. Conversely, ifSessionsis Full,Activity Responsescan also be set to Full.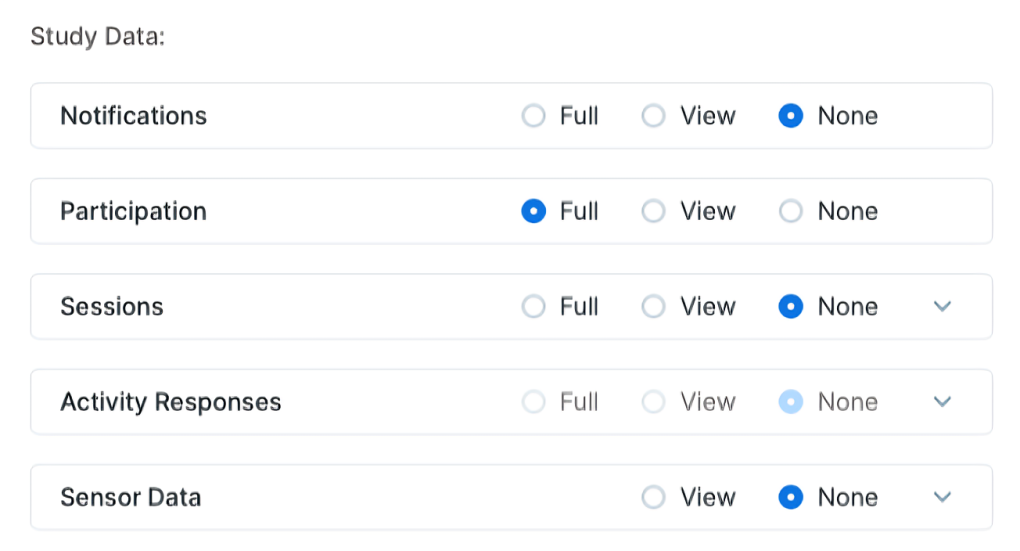
Troubleshooting
I can't see one or more pages/elements in the researcher dashboard
This is likely due to permission restrictions. Contact your study's owner or permission managers to get the necessary permissions. Also, you can adjust your permissions if you are a permission manager.