Activity Sessions
When an Activity is prompted to a participant, Avicenna will create a Session for it. This session will hold information about the prompted Activity, responses provided by the participant or the researchers so far, and other related metadata.
To get an overview of the sessions in your study, follow these steps:
- Open the
Activity Sessionspage on the Researcher Dashboard. - Go to the
Participantstab from the right-side panel and select the participants whose sessions you want to check. Note that currently, you can choose a maximum of 5 participants. - Then go to the
Activitiestab and select your desired Activities. - Press
Apply Filters.
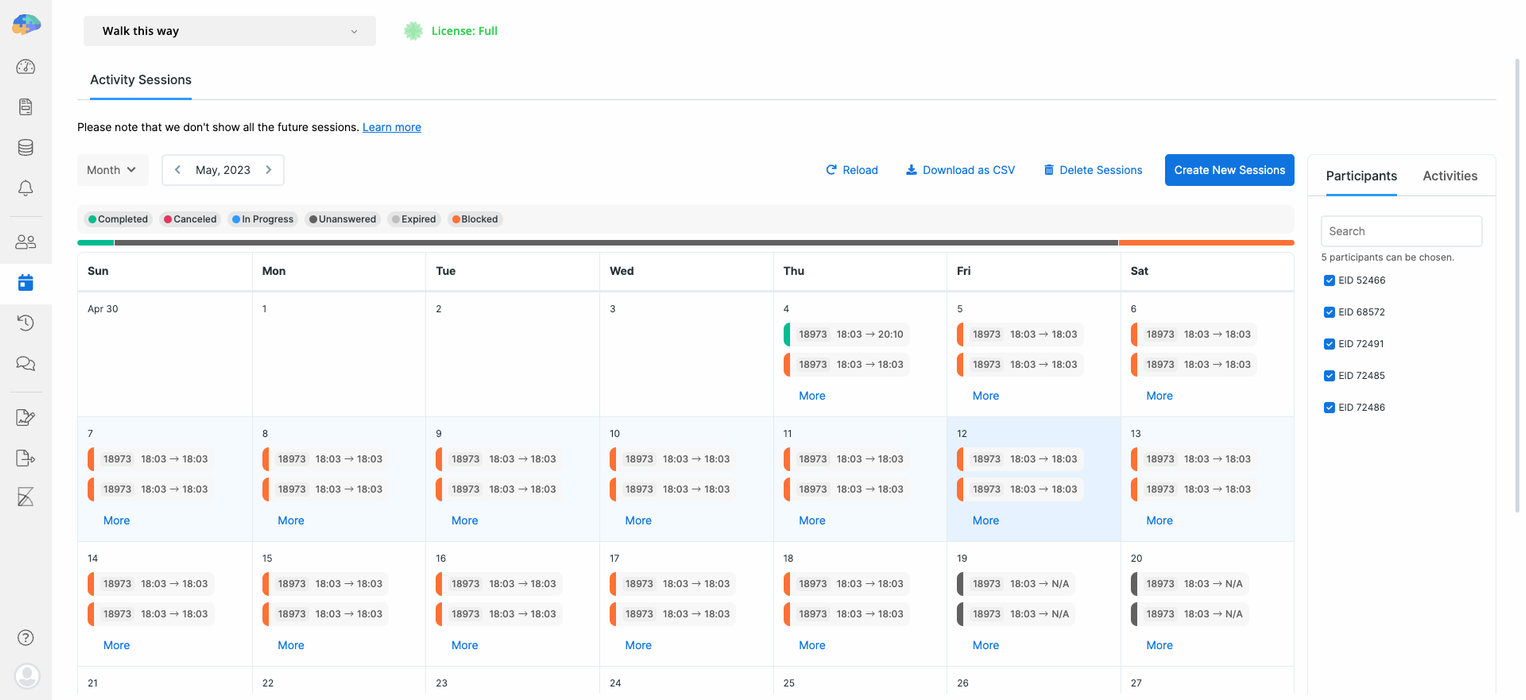
Following this, you can access all the Activity sessions with their status for the selected participants.
You can view the Activity sessions starting when a particular participant joins your study. To do this, after selecting
a Participant ID under the Participants tab, click on the Go to Join Time button that appears. This is an important
feature because it allows you to check all your study sessions and ensure they are created correctly for all the
participants.
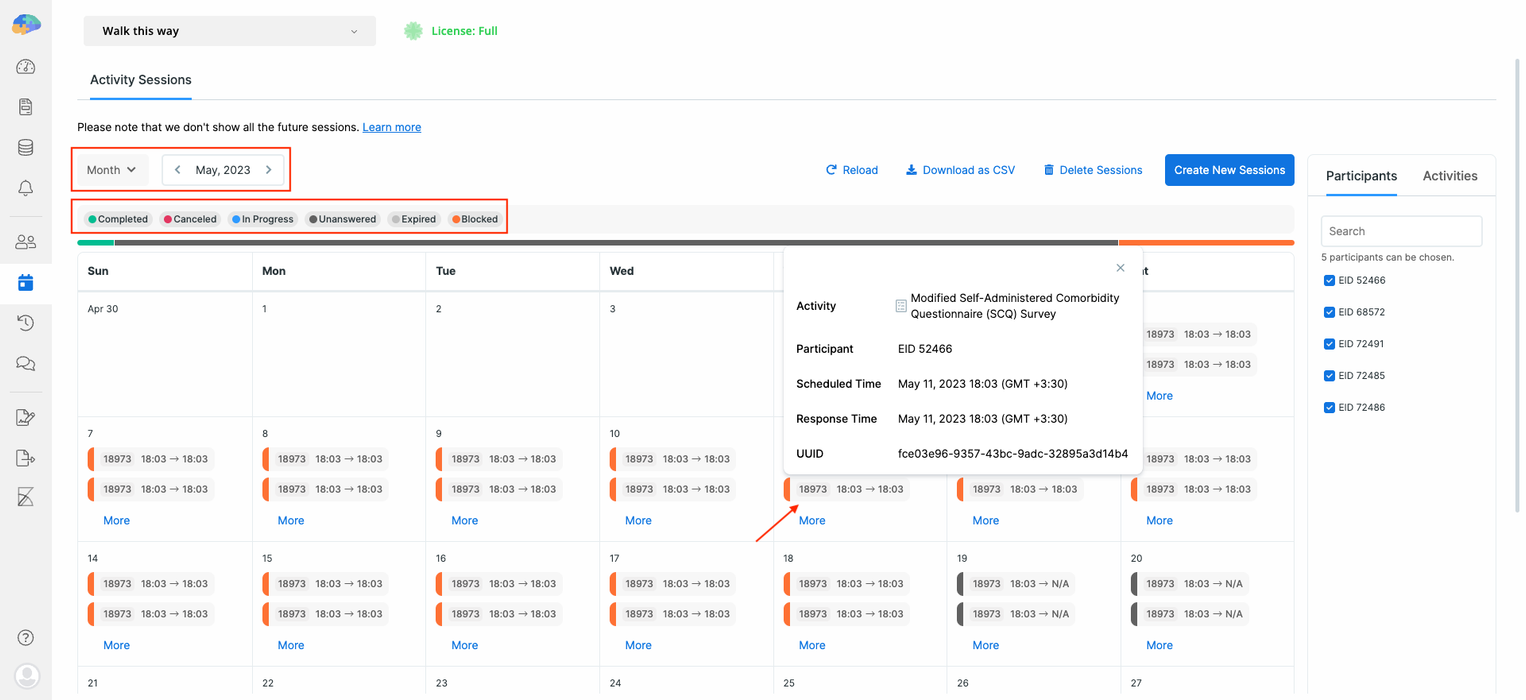
As you see in the top left corner, you can also specify the period that you want the sessions to be displayed in. You can select a Daily, Weekly, Monthly, or Yearly view. Also, below the session statuses, you can find a progress bar. As you hover the mouse over it, a tooltip appears that shows the number and percentage of sessions with a particular status. The image below shows that we have 245 Unanswered sessions for the selected participants, accounting for more than 82% of the sessions.
Also, you can hide or show sessions with specific statuses by tapping their status badge above the calendar. Note that
False Criteria status is unselected by default.

Session Statuses
Each session has a status that can be one of the following:
- Unanswered/Unknown (ID 0) indicates that a response to this particular session hasn't been registered or uploaded yet. This status doesn't necessarily mean the session hasn't been initiated; it might have been prompted, but the response is yet to be recorded.
- Completed (ID 1) indicates the participant completed the session and submitted it.
- Canceled (ID 2) indicates the participant did not want to complete the session and explicitly canceled it.
- Expired (ID 3) indicates the session was not responded to in time, so Avicenna automatically marked the session as expired.
- Blocked (ID 4) indicates the session was blocked by another active session from the same Activity and could not be prompted (more details below).
- In Progress (ID 6) indicates the session is started by the participant but it's not completed, canceled, or expired yet.
- False Criteria (ID 5) indicates the session was not prompted because the criteria for either the corresponding
triggering logic or the activity itself was
False.
In Avicenna, we consider an activity session a "concluded" when its status is one of the following:
- Completed
- Expired
- Canceled
- Blocked
For Expired, any data collected up to the time of expiration will be uploaded to Avicenna servers. Also, Blocked sessions indicate the Activity was not prompted to the participant, and therefore, there is no response available for it.
The status updates might not be immediate. Avicenna server waits for the participant apps to explicitly send the status updates as part of the updates on the corresponding sessions. That's why you might see some sessions that are supposed to be, for example, expired (because their expiry time has passed), while they are not at the moment.
Expired Sessions and Expiry Time
Each Activity can have an Expiry Time, which specifies how long after the Scheduled Time Avicenna should wait for the participant to complete the Activity and submit it. If a participant fails to submit their response within the set timeframe, the session will be labeled as Expired.
Blocked Sessions
Each Activity can only have one session running at a time; sessions cannot overlap. If a new session is triggered while another session is already running for the same Activity, the new session will immediately be closed and labeled as 'Blocked'.
Let's say you schedule an Activity with a Time Trigger Logic (TL) for 8 am and 9 am, with expiry time set to 2 hours. At 8 am, Avicenna prompts the participant, starting a new session and waiting for completion. If by 9 am the participant hasn't responded or canceled the first session, the 9 am session can't start because the 8 am session is still active. Avicenna will then mark the 9 am session as 'Blocked'."
Bear in mind that once a session is canceled, expired, blocked, or completed, the corresponding upcoming Session Release Notifications will not be sent.
Sessions Metadata
Each session on the calendar shows three pieces of information (or metadata):
- Activity ID
- Scheduled time (excluding the date part)
- Response time (excluding the date part)
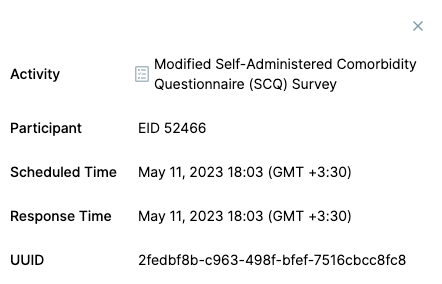
Clicking on each session will give you more metadata which includes Activity (including its name), Participant, Scheduled Time (including the date part), Response Time (including the date part), and UUID.
- UUID is a Universal Unique Identifier that uniquely identifies a session in Avicenna.
- Scheduled Time specifies the time that the Activity was scheduled to be prompted. For sessions that are prompted via Triggering Logics types other than Time TL, this is set to the time the Avicenna app starts the session.
- Response Time specifies the time the Activity session was concluded and queued to be uploaded to the Avicenna server.
Sometimes, Response Time values are shown as "N/A". For False Criteria sessions, this can be obvious. But this can
also mean that the session hasn't concluded yet, at least from the server's point of view. This is because Avicenna
mobile apps can work offline too. And, even in cases where the session has an expiration time (which is already known to
the server), the server can't be 100% certain that the session is expired, completed, canceled, or blocked; the server
will be certain only when the participant apps send the status update to the server.
Whether you use Avicenna as a researcher or participant, all time values are automatically converted to your local time zone, i.e., Avicenna displays all the sessions based on the user's local time zone. Please refer to the Participation Period to learn how Avicenna deals with time.
Let's work on an example scenario here. Assume that you are interested in viewing all the sessions that were or will be prompted for one of your study's participants (ID: 59982) in March 2023. To see these Activity sessions,
- Choose the
Participantsand theActivitiesfrom the right-side panel. - Press
Apply Filters. - Then set the view to
Monthand select March 2023 for the date range.
Now you can see all the sessions scheduled for this participant in March 2023 with their status. Note that if there are
more than two sessions in a cell, you will see a More button, which, if clicked on, will show you the list of all
sessions in that particular time slot cell.
Actions on the Activity Sessions
You can perform several actions on a session on the Activity Sessions page, including creating, editing, and
deleting sessions. You can also edit the responses to a session as a researcher.
Creating a Session
The Activity Sessions page offers you two ways to create a session, and after creating such sessions, the mobile
devices for the corresponding participants will get reloaded automatically.
Using a CSV File
You can tap the Create New Sessions button above the calendar and select Create via CSV File to upload a CSV file.
The CSV file must include the Participant ID, the Activity ID, and the Scheduled Time in each row. For instance, the CSV
file can be like this:
user_id,activity_id,scheduled_time
44457,14269,1705814200000
44658,14369,1706821400000
If you still need a sample file to modify and use, you can download it by clicking on the link inside the dialog you can see below:
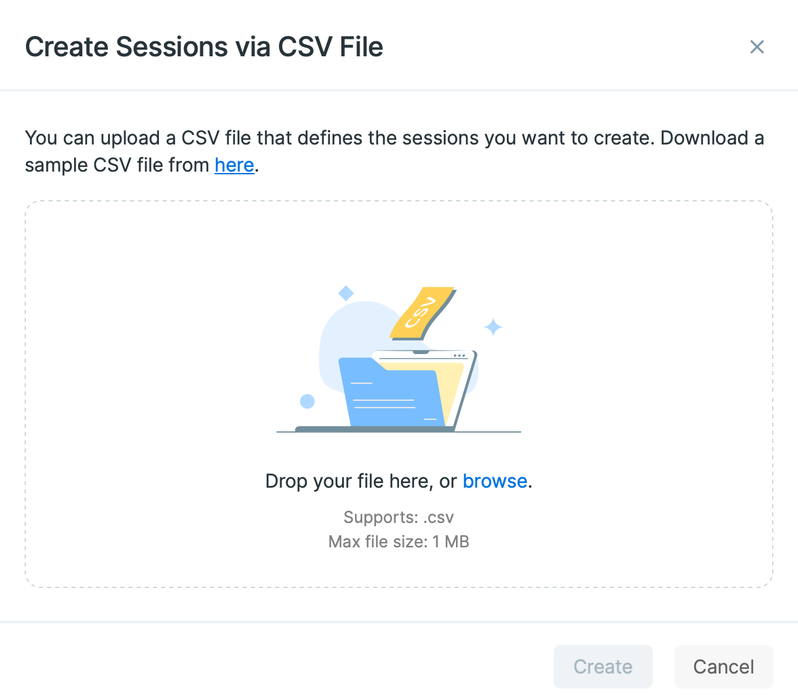
In this interface, you have the option to either drag and drop your file or choose it directly from your device. Upon confirmation, a dialog will appear displaying which sessions were successfully created and identifying any that encountered issues:
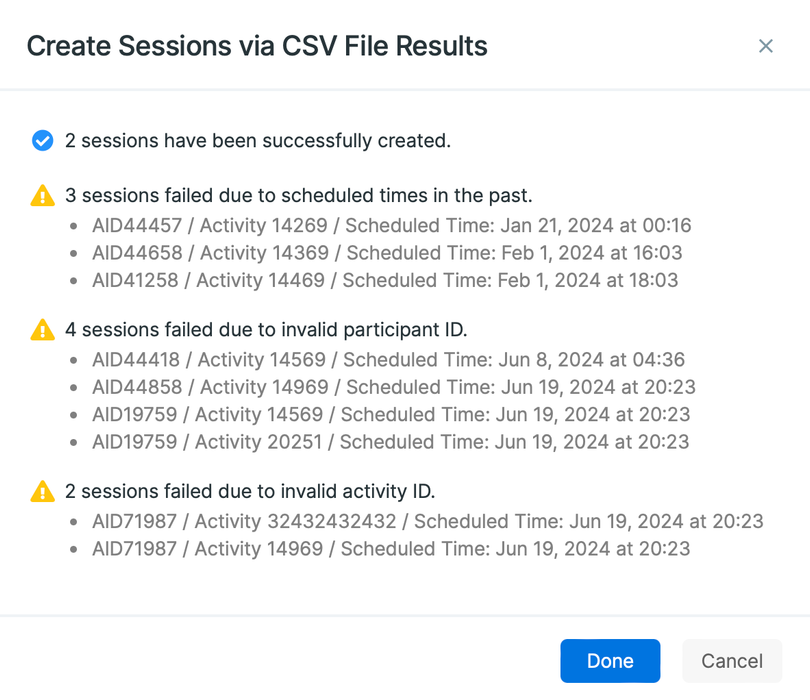
The Scheduled Time should be in milliseconds since the Unix epoch. You can use a tool like Epoch Converter to convert the date and time to milliseconds.
Using the Calendar
Another way is that you can also click on the whitespace area of the calendar cells for the upcoming days. This will
take you to the Create Session dialog, where you can specify the Activity, the Participant, the Scheduled
Time, and the Expiry Time. Note that the session that you create this way or using a CSV file will be a
Researcher-Defined Session.
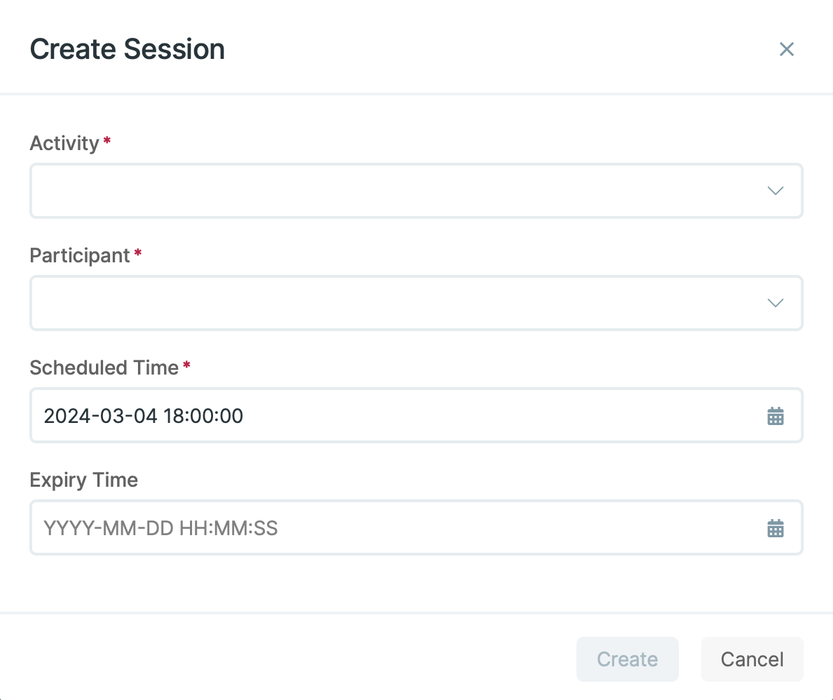
When you create a session in the Create Session dialog, only the selected participants from the right-side panel will be visible in the Participant field. Also, you can create sessions for one participant at a time. However, using the CSV option, you can create multiple sessions for multiple participants and activities.
Releasing an Activity
There might be times that you want to prompt the Activity right away to one or more participants. Avicenna allows you to manually trigger an Activity. To read more about this, check the Manually Triggering an Activity section.
Deleting a Session
If you want to delete a session, there are two ways:
-
First, tap the
Delete Sessionsbutton above the calendar and enter the UUID of the sessions you want to delete. As you see in the image below, you can only delete the Researcher-Defined sessions here. Also, note that only future sessions can be deleted.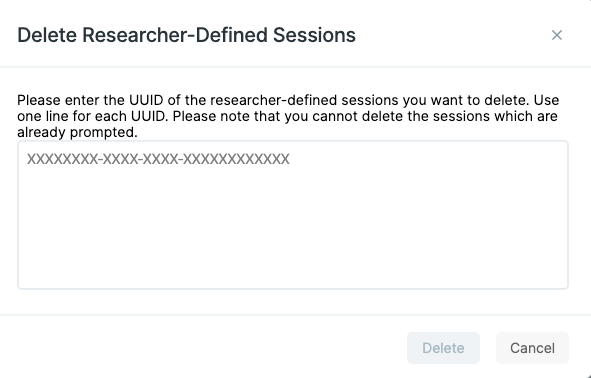
-
Second, click on any session (in the future or the past) in the calendar and tap the
Deleteicon. Doing this opens a dialog where you must confirm that you want to delete the session. Note that here you can delete all the possible session types, including Time TL and Researcher-Defined sessions. Avicenna will automatically reload the devices for such sessions.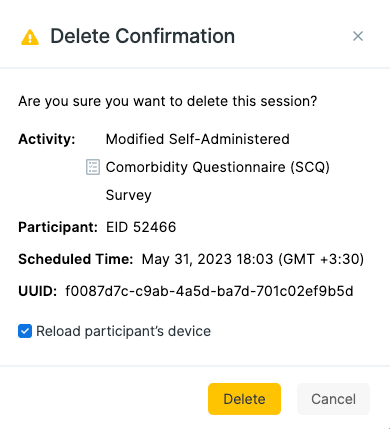
Editing a Session
In addition to creating or deleting, you can edit a session on the Sessions page. Keep in mind that you can only edit future sessions. To do this,
- Click on an upcoming session in the calendar.
- Then tap the
Editicon. - You can change the Scheduled Time and Expiry Time in the opened dialog.
- By default, the participant's device will be reloaded to ensure the changes are applied.
Note that, like deleting a session, you won't see the Reload participant's device option for the Researcher-Defined sessions, as Avicenna will automatically update them.
The Edit Session option is disabled for Researcher-responded sessions
due to the immediate scheduling nature of these sessions. As they are set to occur 'now,' effectively the moment they
are created, their scheduled time is immediately considered to have passed. Consequently, no changes can be made to the
session once it has begun.
Editing Responses
Available for surveys only, excluding Eligibility and Dropout surveys
As a researcher, you may need to edit the responses of the participants. Avicenna allows you to edit the responses of the participants for a session. To do this, follow these steps:
-
Go to the Activity Sessions page.
-
Click on the session you want to edit.
-
Click on the
Edit Responsebutton, and you will be directed to the page where you can edit the responses.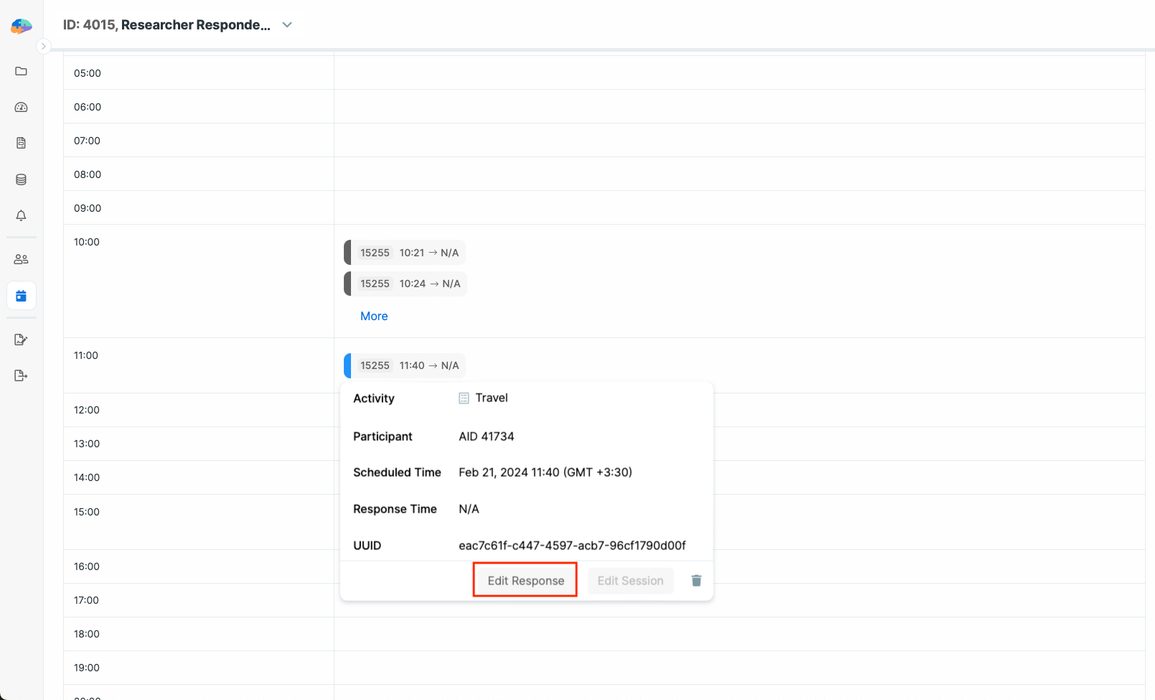
Some types of questions allow you to clear the current answer by clicking on the clear button rather than doing it manually. These question types include:
For surveys, you can also view the response history for each of the questions by clicking on the 3-dots menu and
clicking on View Response History. To learn more, check the
Viewing Survey Response History section.
Also, you can view the comments on any response or add your own. To do this, click on the 3-dots menu and then click on
View Response Comments. To learn more, check the
Commenting on Survey Responses section.
Editing the sessions other than the Researcher-responded sessions will result in reloading the participants' devices.
However, if editing a Researcher-responded session results in a change of criteria or survey question content placeholders of another session, the participants' devices will be reloaded.
When you're editing the responses as a researcher, the session won't expire even if the survey has an expiry time.
Saving a Session
After you have modified the answers, you can Save or Submit the session by clicking on the button at the top right
corner of the page. If you click on Save, the session will be saved and the session's status will be changed to In
Progress.
If the response to a question is invalid based on the question properties (e.g. format, min, max), you won't be able to save your response and you will be informed by an alert message.
Submitting a Session
If you click on Submit, the session will be saved and the session's status will be changed to Completed. However,
the Response Time for the session will be set only the first time you submit your answer.
Same as saving a session, you can't submit your response if your responses are invalid based on the question properties.
Downloading Sessions
The Activity Sessions page also lets you download all the sessions defined in your study in a CSV format. To do that,
tap the Download as CSV button above the calendar. The downloaded file provides information about the sessions,
including the Participant ID, the Activity ID, the Scheduled Time, the Record Time, Status, etc.
Troubleshooting
One or more sessions are missing
If you notice that some sessions are missing from the Activity Sessions page or the downloaded CSV file, you can
follow these steps to diagnose and fix the issue:
- Check the general steps to diagnose participation issues.
- Check the corresponding triggering logic of the activity to see if it's there and if yes, its configurations are as you expect.
- Check if the expected scheduled time is within the participation period of the corresponding participant.
- Check if the the corresponding activity's or triggering logic's criteria, if any, was False for the corresponding participant at the time the session was supposed to be scheduled for.
- Check if the session is manually deleted (either by a researcher or the system somehow). You can do this by finding the "TUD Session Rescheduled or Deleted", "TUD Session Deleted", and "Time Session Rescheduled or Deleted" audit logs for the corresponding participant.
- If the session was supposed to be created by the participant (e.g., based on a User triggering logic), check if the participant was online and synced their sessions and responses with the server since then. You can do this by finding any audit log for the corresponding participant.